pi-cluster
Home · Getting Started · Cluster Guide · Troubleshooting · About

Maintenance
Upkeep once the cluster is built: keeping the software current on every node, and backing up the cards.
Software updates
Goal: keep the OS, packages and firmware on every node current and identical.
Run on: master, using the cluster commands. Before those are set up, run the same commands on each node over SSH.
The nodes need internet access through your router.
Update packages
cluster-cmd sudo apt update
cluster-cmd sudo apt full-upgrade -y
apt update refreshes the list of available packages; full-upgrade installs the new versions. Updating all nodes at the same time keeps their software versions identical, which Hadoop and Spark expect.
Then reboot any node that needs it:
cluster-cmd 'test -f /run/reboot-required && echo "reboot needed" || echo "ok"'
cluster-reboot
Update firmware
The Raspberry Pi 4 and Pi 5 keep their bootloader in a small chip on the board (the EEPROM). Check whether an update is available:
cluster-cmd sudo rpi-eeprom-update
If any node reports an update, apply it and reboot:
cluster-cmd sudo rpi-eeprom-update -a
cluster-reboot
When to update
- Before installing Hadoop or Spark.
- Every month or so afterwards, when no job is running.
- Stop HDFS and Spark first (see Cluster Setup), so a reboot doesn’t interrupt a job.
Back up and restore cards
Goal: save a microSD card to an image file on your computer, and write it back later.
Run on: your own computer, with the card in a card reader.
An OS image (.img) is a byte-for-byte copy of a whole card: every partition, file and setting. You can compress it (.img.gz, .img.xz or .zip) and Raspberry Pi Imager will still write it.
Back up master once the cluster works: it holds the HDFS NameNode’s metadata, and without it the data on the workers can’t be read.
Back up a card
Shut the Pi down first (sudo shutdown -h now), then move its card to your computer. The image is as large as the card, not the data on it, so a 32 GB card needs 32 GB free.
Windows
- Install Win32 Disk Imager.
- In Image File, type a path ending in
.img, for exampleC:\Users\alice\Desktop\master-2026-10-30.img. - In Device, pick the card’s drive letter. Check it twice.
- Click Read and wait.
macOS
diskutil list                          # find the card, e.g. /dev/disk4
diskutil unmountDisk /dev/disk4
sudo dd if=/dev/rdisk4 of=master.img bs=4m status=progress
gzip master.img                        # optional: compress to master.img.gz
Replace disk4 with your card’s number. rdisk (with an r) is much faster than disk.
Linux
lsblk                                  # find the card, e.g. /dev/sdb or /dev/mmcblk0
sudo umount /dev/sdb?*
sudo dd if=/dev/sdb of=master.img bs=4M status=progress conv=fsync
gzip master.img                        # optional
Replace /dev/sdb with your card. dd overwrites whatever of= points to without asking, so make sure if= is the card and of= is a file.
Restore a card
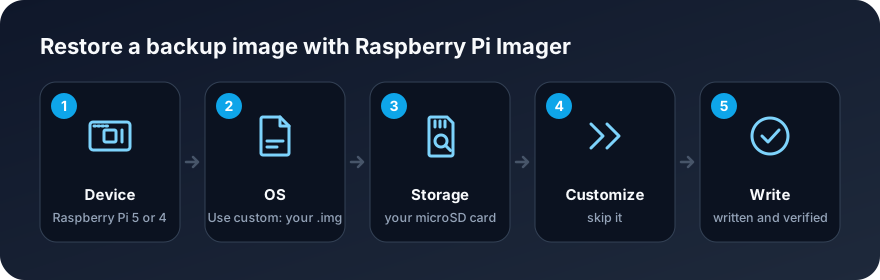
- Open Raspberry Pi Imager and choose your device.
- For the operating system, scroll down to Use custom and pick your
.img,.img.gz,.img.xzor.zipfile. - Choose your microSD card.
- Skip customization: the backup already has its hostname, user and keys.
- Write and wait for the verification.
The new card must be at least as large as the one you backed up.
Cloning one card to the others
Flashing each card separately with Imager (Install OS) is quicker and safer than cloning, since Imager sets each node’s identity for you. Clone only if you have customized one node heavily and want to copy that work.
A clone is an exact copy, so every cloned node starts with the same hostname, the same SSH host keys and the same machine ID as the original. Nodes with duplicate identities confuse SSH (“host key changed” warnings) and some network services. Fix each clone on its first boot:
-
Before the first boot, with the card still in your computer, open
user-dataon the card’sbootfspartition and change thehostname:line to the new name, such ashostname: worker2. Current Raspberry Pi OS resets the hostname from this file on every boot. Older images without this file can skip this step. -
Boot the clone, log in with
ssh alice@<its-ip-address>and give it new SSH host keys and a new machine ID:sudo hostnamectl set-hostname worker2 sudo rm /etc/ssh/ssh_host_* sudo ssh-keygen -A sudo rm /etc/machine-id sudo systemd-machine-id-setup sudo reboot -
On every computer that had logged in to the original, remove the old fingerprint for the new name:
ssh-keygen -R worker2
Check: hostname prints the new name, and cat /etc/machine-id differs on every node.
Back to the Cluster Guide